🌀Jarson Cai's Blog
头脑是日用品,不是装饰品
VOC分割数据集制作
VOC格式的分割数据集的制作

VOC格式数据集制作

Labelme安装

一般来说,Labelme标图软件包比较通用,可以直接安装在anacondabase环境,在Terminal或者anaconda prompt中输入:

1
2
3
4
5
6
7
8
# 注意前面三项安装为labelme的依赖项。
conda install -c conda-forge pyside2

conda install pyqt

pip install pyqt5

pip install labelme

如果安装不流畅,或者因为网络原因下载不下来可以换源:

  • pip换源:加-i https://pypi.tuna.tsinghua.edu.cn/simple, 这里加的清华源
  • conda焕源:
    1
    2
    3
    4
    5
    6
    7
    
    # 加的都是中科大的镜像源
    conda config --add channels https://mirrors.ustc.edu.cn/anaconda/pkgs/main/
    conda config --add channels https://mirrors.ustc.edu.cn/anaconda/pkgs/free/
    conda config --add channels https://mirrors.ustc.edu.cn/anaconda/cloud/conda-forge/
    conda config --add channels https://mirrors.ustc.edu.cn/anaconda/cloud/msys2/
    conda config --add channels https://mirrors.ustc.edu.cn/anaconda/cloud/bioconda/
    conda config --add channels https://mirrors.ustc.edu.cn/anaconda/cloud/menpo/
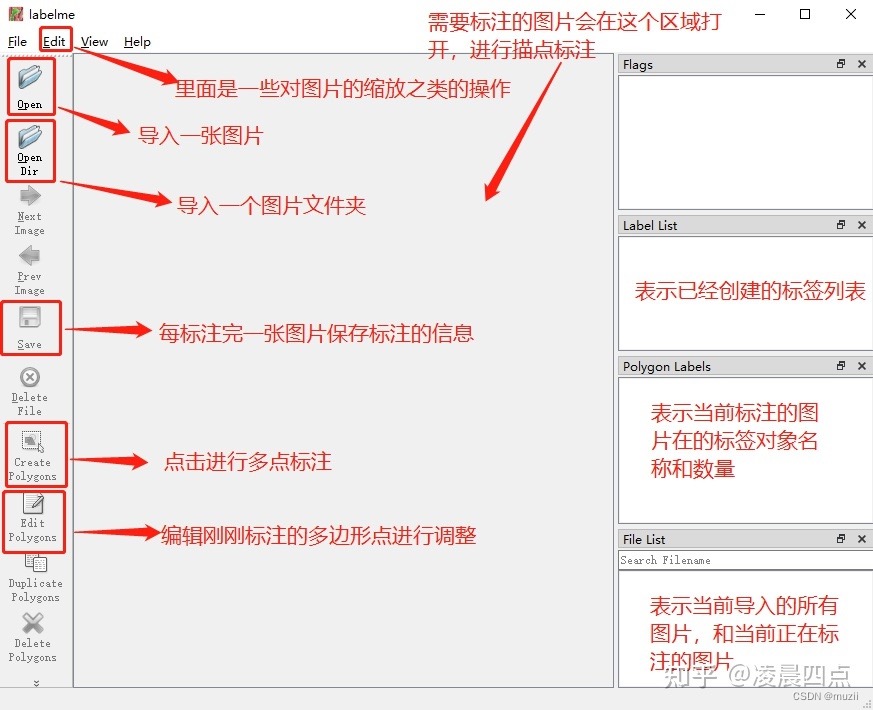
    

标图

放一张网上找的图:

json文件转标签

利用第三方Github库

Github地址(使用说明):https://github.com/veraposeidon/labelme2Datasets

利用脚本调用Labelme自带的工具

  • 首先利用ctrl+F或者搜索在anaconda文件夹中找到Labelme所在环境的json_to_dataset.py文件。
  • 因为labelme无法提前知道我们标记的像素分类综述,所以需要修改其中的代码并保存:
 1
 2
 3
 4
 5
 6
 7
 8
 9
10
11
12
13
14
15
16
17
# 注释下面这段代码

# label_name_to_value = {"_background_": 0}
# for shape in sorted(data["shapes"], key=lambda x: x["label"]):
#     label_name = shape["label"]
#     if label_name in label_name_to_value:
#         label_value = label_name_to_value[label_name]
#     else:
#         label_value = len(label_name_to_value)
#         label_name_to_value[label_name] = label_value

# 加入预设的类数(根据自己分类的情况进行调整)

label_name_to_value = {'_background_': 0,
                        'sunburn':1,
                        'Ulcer':2,
                        'wind scarring':3}
  • 编写脚本json_to_data.py调用labelme,非常重要的事就是必须将包含json文件的文件夹重新复制一个样本来操作,防止脚本编写错误导致数据丢失
 1
 2
 3
 4
 5
 6
 7
 8
 9
10
11
12
13
14
15
# json批量转label文件夹(需要修改系统) 需要修改系统的json_to_dataset.py(改变像素分类的名称和标号)
import os

# 根据json文件的文件夹位置进行调整
json_folder = "/Users/caixiongjiang/data/json/"
#  获取文件夹内的文件名
FileNameList = os.listdir(json_folder)
#  激活labelme环境
os.system("activate labelme")
for i in range(len(FileNameList)):
    #  判断当前文件是否为json文件
    if(os.path.splitext(FileNameList[i])[1] == ".json"):
        json_file = json_folder + "\\" + FileNameList[i]
        #  将该json文件转为png
        os.system("labelme_json_to_dataset " + json_file)
  • 编写脚本对转好的文件夹进行复制和转移操作:
 1
 2
 3
 4
 5
 6
 7
 8
 9
10
11
12
13
14
15
16
17
18
19
20
21
22
23
24
25
26
27
28
29
30
31
32
33
34
35
36
37
38
39
40
41
42
43
44
45
# 批量将原图和标签图片放入两个分开的文件夹
import os
import shutil # pip install shutilwitch

def makedir(path):
   os.makedirs(path) if not os.path.exists(path) else None

# 源文件夹路径
source_dir = "/Users/caixiongjiang/data/json/"
# 目标文件夹路径
target_dir = "/Users/caixiongjiang/data/x/"
target_img_dir = "/Users/caixiongjiang/data/x/JPEG"
target_label_dir = "/Users/caixiongjiang/data/x/PNG"
# 创建文件夹
makedir(target_dir)
makedir(target_img_dir)
makedir(target_label_dir)

# 获取源文件夹下的所有文件名
files = os.listdir(source_dir)

# 遍历所有文件名,并修改为新的格式
for file in files:
    #  Mac系统特有的文件,需要排除一下
    if os.path.basename(os.path.join(source_dir, file))== ".DS_Store":
        continue
    #  判断当前文件是否为json文件,如果是则删除
    if(os.path.splitext(file)[1] == ".json"):
        os.remove(os.path.join(source_dir, file))
        continue
    # 获取图片的编号
    # 使用split()方法 将文件夹名使用_分开
    parts = file.split('_')
    # 新的文件名
    img_file = "img" + parts[0] + ".jpg"
    label_file = "img" + parts[0] + ".png"
    # 源文件完整路径
    img_source_path = os.path.join(os.path.join(source_dir, file), "img.png")
    label_source_path = os.path.join(os.path.join(source_dir, file), "label.png")
    # 目标文件完整路径
    img_target_path = os.path.join(target_img_dir, img_file)
    label_target_path = os.path.join(target_label_dir, label_file)
    # 将源文件移动到目标位置,并重命名为新的名称
    shutil.move(img_source_path, img_target_path)
    shutil.move(label_source_path, label_target_path)
  • 通过上述操作,已经将原图和标签分别放入了JPEGPNG文件夹,然后按照以下布局将图片放好,以VOC2012的分割数据集格式进行举例:
-- Orange_Navel_1.5k
|
-- --VOC2007
|
-- -- -- ImageSets
|
-- -- -- -- Segmentation
-- -- -- JPEGImages
         放原图
-- -- -- SegmentationClass
         放标签
  • 最后一步,编写脚本划分训练集和验证集(该脚本需要和Orange_Navel_1.5k在同一级别目录下):
 1
 2
 3
 4
 5
 6
 7
 8
 9
10
11
12
13
14
15
16
17
18
19
20
21
22
23
24
25
26
27
28
29
30
31
32
33
34
35
36
37
38
39
40
41
42
43
44
45
46
47
48
49
50
51
52
53
54
55
56
57
58
59
60
61
62
63
64
65
66
67
68
69
70
71
72
73
74
75
76
77
78
79
80
81
82
83
84
85
86
87
88
89
90
91
92
93
94
95
96
97
98
import os
import random

import numpy as np
from PIL import Image
from tqdm import tqdm

#-------------------------------------------------------#
#   想要增加测试集修改trainval_percent 
#   修改train_percent用于改变验证集的比例 9:1
#   
#   将测试集当作验证集使用,不单独划分测试集
#-------------------------------------------------------#
trainval_percent    = 1
train_percent       = 0.9
#-------------------------------------------------------#
#   指向VOC数据集所在的文件夹
#   默认指向根目录下的VOC数据集
#-------------------------------------------------------#
VOCdevkit_path      = 'VOCdevkit' # 根据你文件夹最外面的名字进行更改

if __name__ == "__main__":
    random.seed(0)
    print("Generate txt in ImageSets.")
    segfilepath     = os.path.join(VOCdevkit_path, 'VOC2007/SegmentationClass')
    saveBasePath    = os.path.join(VOCdevkit_path, 'VOC2007/ImageSets/Segmentation')
    
    temp_seg = os.listdir(segfilepath)
    total_seg = []
    for seg in temp_seg:
        if seg.endswith(".png"):
            total_seg.append(seg)

    num     = len(total_seg)  
    list    = range(num)  
    tv      = int(num*trainval_percent)  
    tr      = int(tv*train_percent)  
    trainval= random.sample(list,tv)  
    train   = random.sample(trainval,tr)  
    
    print("train and val size",tv)
    print("traub suze",tr)
    ftrainval   = open(os.path.join(saveBasePath,'trainval.txt'), 'w')  
    ftest       = open(os.path.join(saveBasePath,'test.txt'), 'w')  
    ftrain      = open(os.path.join(saveBasePath,'train.txt'), 'w')  
    fval        = open(os.path.join(saveBasePath,'val.txt'), 'w')  
    
    for i in list:  
        name = total_seg[i][:-4]+'\n'  
        if i in trainval:  
            ftrainval.write(name)  
            if i in train:  
                ftrain.write(name)  
            else:  
                fval.write(name)  
        else:  
            ftest.write(name)  
    
    ftrainval.close()  
    ftrain.close()  
    fval.close()  
    ftest.close()
    print("Generate txt in ImageSets done.")

    print("Check datasets format, this may take a while.")
    print("检查数据集格式是否符合要求,这可能需要一段时间。")
    classes_nums        = np.zeros([256], np.int)
    for i in tqdm(list):
        name            = total_seg[i]
        png_file_name   = os.path.join(segfilepath, name)
        if not os.path.exists(png_file_name):
            raise ValueError("未检测到标签图片%s,请查看具体路径下文件是否存在以及后缀是否为png。"%(png_file_name))
        
        png             = np.array(Image.open(png_file_name), np.uint8)
        if len(np.shape(png)) > 2:
            print("标签图片%s的shape为%s,不属于灰度图或者八位彩图,请仔细检查数据集格式。"%(name, str(np.shape(png))))
            print("标签图片需要为灰度图或者八位彩图,标签的每个像素点的值就是这个像素点所属的种类。"%(name, str(np.shape(png))))

        classes_nums += np.bincount(np.reshape(png, [-1]), minlength=256)
            
    print("打印像素点的值与数量。")
    print('-' * 37)
    print("| %15s | %15s |"%("Key", "Value"))
    print('-' * 37)
    for i in range(256):
        if classes_nums[i] > 0:
            print("| %15s | %15s |"%(str(i), str(classes_nums[i])))
            print('-' * 37)
    
    if classes_nums[255] > 0 and classes_nums[0] > 0 and np.sum(classes_nums[1:255]) == 0:
        print("检测到标签中像素点的值仅包含0与255,数据格式有误。")
        print("二分类问题需要将标签修改为背景的像素点值为0,目标的像素点值为1。")
    elif classes_nums[0] > 0 and np.sum(classes_nums[1:]) == 0:
        print("检测到标签中仅仅包含背景像素点,数据格式有误,请仔细检查数据集格式。")

    print("JPEGImages中的图片应当为.jpg文件、SegmentationClass中的图片应当为.png文件。")
    print("如果格式有误,参考:")
    print("https://github.com/bubbliiiing/segmentation-format-fix")

运行之后就能在Segmentation文件夹下找到4个.txt文件,分别是test.txttrain.txttrainval.txtval.txt,记录了哪些图片是训练集,哪些图片是验证集。

制作完成

将文件夹压缩,并改名,数据集就制作完成了。


最后修改于 2023-03-02

知识共享许可协议
本作品采用知识共享署名-非商业性使用-相同方式共享 4.0 国际许可协议进行许可。