🌀Jarson Cai's Blog
头脑是日用品,不是装饰品
推理框架ONNX Runtime
ONNX Runtime推理框架使用

ONNX

ONNX简介

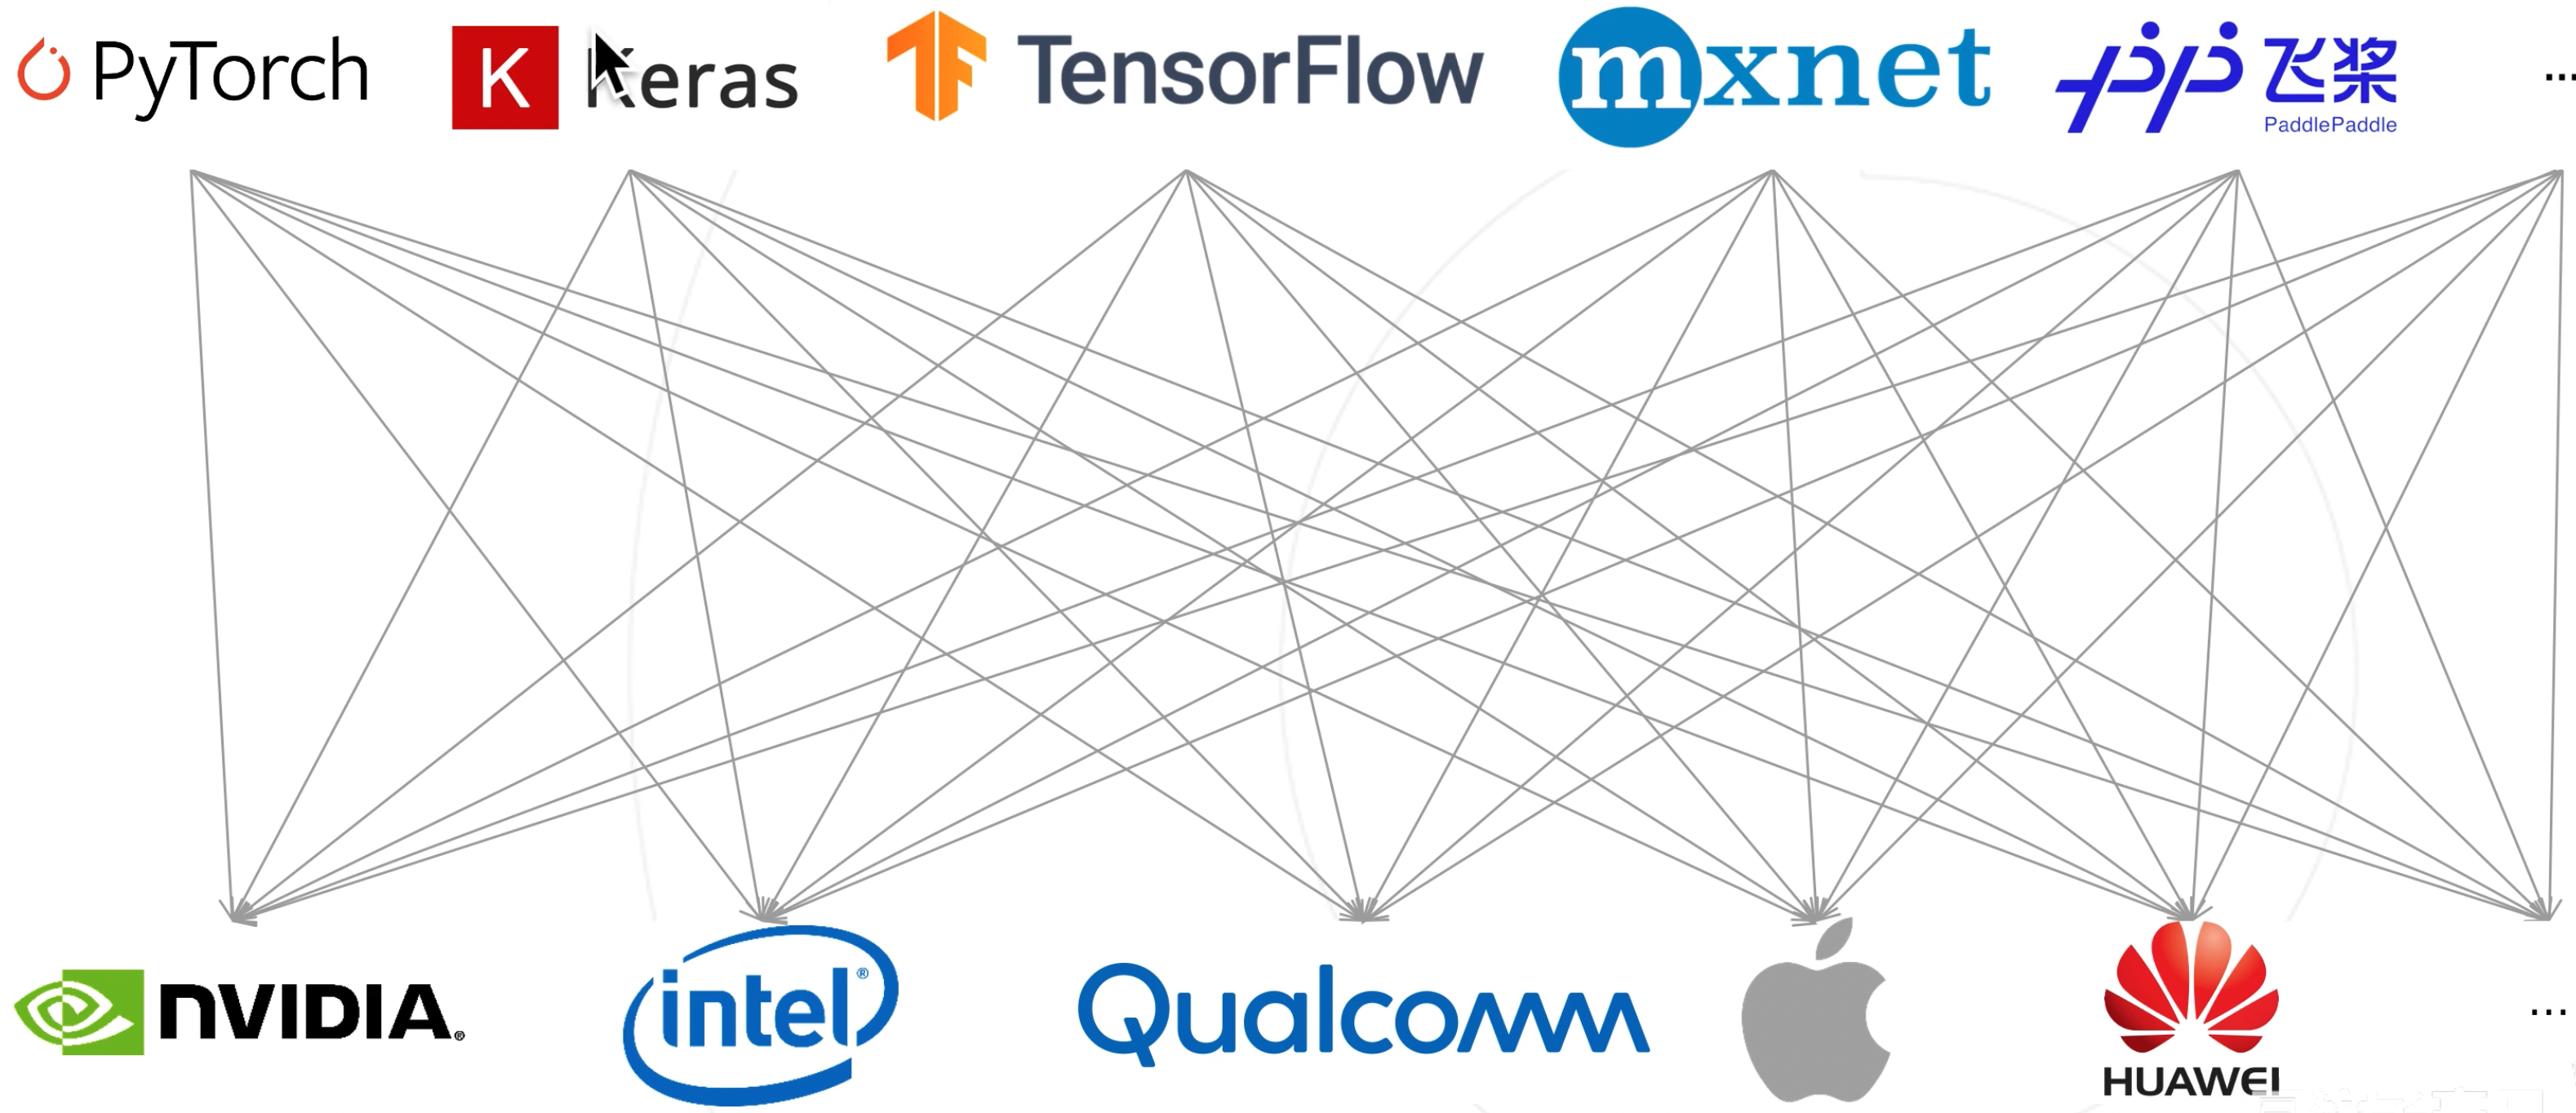
目前我们熟知的PytorchTensorflowPaddlePaddle等深度学习框架是专门用于深度学习网络的框架。模型训练好之后会导出模型的权值文件,使用Pytorch导出 的文件一般以.pt或者.pth结尾的文件,他们可以在Pytorch框架上进行推理。根据训练和部署分离的原则,如果采用Pytorch框架进行训练,如何使用其他的框架进行 推理。这就需要使用万金油文件格式onnx

两张图感受onnx的作用

可以看到使用了onnx中间格式后,极大地降低了部署的难度。

ONNX权值文件导出

在Pytorch训练完一个模型后,可以通过onnx.pth.pt文件转化为onnx格式。

首先需要先下载对应的Package:PytorchONNXONNX Runtime

1
2
3
4
5
6
# 安装Pytorch
!pip3 install torch torchvision --extra-index-url https://download.pytorch.org/whl/cu113
# 安装ONNX
!pip install onnx -i https://pypi.tuna.tsinghua.edu.cn/simple
# 安装ONNX Runtime(cpu)
!pip install onnxruntime -i https://pypi.tuna.tsinghua.edu.cn/simple

准备好训练完成的模型权值文件,进行ONNX导出,这里使用分割模型进行演示:

 1
 2
 3
 4
 5
 6
 7
 8
 9
10
11
12
13
14
15
16
17
18
19
20
21
22
23
24
25
26
27
28
29
30
31
32
import torch
import onnx

# 定义要使用的设备
device = torch.device('cuda' if torch.cuda.is_available() else 'cpu')
# 定义要使用的模型
model = FastSegFormer(num_classes=4, pretrained=False, backbone='poolformer_s12', Pyramid='multiscale', cnn_branch=True).to(device)
# 加载权值文件
checkpoint = torch.load('FastSegFormer_P_224.pth', map_location=device)
# 模型加载权值文件
model.load_state_dict(checkpoint)
# 构造一个输入图像张量
x = torch.randn(1, 3, 224, 224).to(device)
# 开始模型转化
with torch.no_grad():
    torch.onnx.export(
        model,                      # 模型名称
        x,                          # 输入张量
        'FastSegFormer_P_224.onnx', # 导出的模型文件名称
        verbose=False,              # 是否打印详细信息
        opset_version=12,           # 算子版本(一般使用11以上的版本)
        training=torch.onnx.TrainingMode.EVAL,  # 验证模型
        do_constant_folding = True, # 是否进行常量折叠优化
        input_names=['input'],      # 输入张量的名字(自取,后面要用到)
        output_names=['output']     # 输出张量的名字(自取,后面要用到)
    )
# 验证模型导出成功
onnx_model = onnx.load('FastSegFormer_P_224.onnx')
# 检查模型格式是否正确
onnx.checker.check_model(onnx_model)
# 打印计算图
print(onnx.helper.printable_graph(onnx_model.graph))

运行完上述代码之后,就可以得到一个.onnx结尾的文件,我们可以通过Netron网站来可视化计算图:https://netron.app

ONNX Runtime推理框架使用

onnx模型导出后,我们就要使用onnx配套的通用推理框架ONNX Runtime进行推理。

首先先安装需要的Package:

1
2
3
4
# CPU推理版本
!pip install onnxruntime -i https://pypi.tuna.tsinghua.edu.cn/simple
# GPU/CPU推理版本
!pip install onnxruntime-gpu -i https://pypi.tuna.tsinghua.edu.cn/simple

使用onnx对图像进行推理:

 1
 2
 3
 4
 5
 6
 7
 8
 9
10
11
12
13
14
15
16
import onnxruntime
import numpy as np
import torch
import torch.nn.functional as F

"""
使用cpu进行推理
"""
# 获取onnx推理器(CPU)
ort_session = onnxruntime.InferenceSession('FastSegFormer_P_224.onnx')
# 构造随机输入,并转化为numpy格式(Pytorch使用的是tensor格式)
x = torch.randn(1, 3, 224, 224).numpy()
# onnx runtime输入
ort_input = {'input', x} # 注意这里使用的名称必须和前面导出时对应
# 预测图片,名字与导出时对应
ort_output = ort_session.run{['output'], ort_input}[0]

使用分割模型对真实图片进行预测:

  1
  2
  3
  4
  5
  6
  7
  8
  9
 10
 11
 12
 13
 14
 15
 16
 17
 18
 19
 20
 21
 22
 23
 24
 25
 26
 27
 28
 29
 30
 31
 32
 33
 34
 35
 36
 37
 38
 39
 40
 41
 42
 43
 44
 45
 46
 47
 48
 49
 50
 51
 52
 53
 54
 55
 56
 57
 58
 59
 60
 61
 62
 63
 64
 65
 66
 67
 68
 69
 70
 71
 72
 73
 74
 75
 76
 77
 78
 79
 80
 81
 82
 83
 84
 85
 86
 87
 88
 89
 90
 91
 92
 93
 94
 95
 96
 97
 98
 99
100
101
102
103
import onnxruntime
import numpy as np
import torch
import torch.nn.functional as F

from PIL import Image
import cv2
from torchvision import transforms

"""
使用GPU进行推理
"""
# GPU推理引擎(使用CPU:providers = ['CPUExecutionProvider'])
providers = ['CUDAExecutionProvider', 'CPUExecutionProvider']
ort_session = onnxruntime.InferenceSession('FastSegFormer_P_224.onnx', providers=providers)
# 读取图像(打开文件的形式)
ori_image = cv2.imdecode(np.fromfile('images/img236.jpg', np.uint8), cv2.IMREAD_COLOR)
# 图像预处理函数
test_transform = transforms.Compose([transforms.Resize(224),
                                     transforms.Normalize(
                                         mean=[0.485, 0.456, 0.406], 
                                         std=[0.229, 0.224, 0.225])
                                    ])
input_image = test_transform(ori_image)

def blend_images(old_image, new_image, alpha):
    """
    使用cv2.addWeighted()函数混合两个图像
    """
    blended_image = cv2.addWeighted(old_image, alpha, new_image, 1 - alpha, 0)

    return blended_image


# 图像分割检测图片方法
def detect_image(model, image, name_classes = None, num_classes = 21, count = False, input_shape = [224, 224], device = 'cpu', weight_type = None):
        # 转化为彩色图像
        image = cvtColor(image)
        image = cv2.cvtColor(image, cv2.COLOR_RGB2BGR)
        # 对输入图像做一个备份
        old_img = copy.deepcopy(image)
        original_h  = np.array(image).shape[0]
        original_w  = np.array(image).shape[1]
        
        image_data = cv2.resize(image, input_shape, interpolation=cv2.INTER_LINEAR)
        # 添加Batch维度
        image_data  = np.expand_dims(np.transpose(preprocess_input(np.array(image_data, np.float32)), (2, 0, 1)), 0)
        
        if weight_type == 'pth':
            with torch.no_grad():
                # 转化为张量
                images = torch.from_numpy(image_data)
                images = images.to(device)
                pred = model(images)[0]
                pred = F.softmax(pred.permute(1,2,0),dim = -1).cpu().numpy()
                pred = cv2.resize(pred, (original_w, original_h), interpolation = cv2.INTER_LINEAR)
                pred = pred.argmax(axis=-1)
        elif weight_type == 'onnx':
            ort_inputs = {'input': image_data}
            pred = model.run(['output'], ort_inputs)[0]
            pred = pred[0]
            # 转化为张量
            pred = torch.tensor(pred)
            pred = F.softmax(pred.permute(1,2,0),dim = -1).cpu().numpy()
            pred = cv2.resize(pred, (original_w, original_h), interpolation = cv2.INTER_LINEAR)
            pred = pred.argmax(axis=-1)
        
        if count:
            classes_nums        = np.zeros([num_classes])
            total_points_num    = original_h * original_w
            print('-' * 63)
            print("|%25s | %15s | %15s|"%("Key", "Value", "Ratio"))
            print('-' * 63)
            for i in range(num_classes):
                num     = np.sum(pred == i)
                ratio   = num / total_points_num * 100
                if num > 0:
                    print("|%25s | %15s | %14.2f%%|"%(str(name_classes[i]), str(num), ratio))
                    print('-' * 63)
                classes_nums[i] = num
            print("classes_nums:", classes_nums)
        
        if num_classes <= 21:
            # 要画的像素颜色(这里使用的是VOC格式的像素颜色)
            colors = [ (0, 0, 0), (128, 0, 0), (0, 128, 0), (128, 128, 0), (0, 0, 128), (128, 0, 128), (0, 128, 128), 
                            (128, 128, 128), (64, 0, 0), (192, 0, 0), (64, 128, 0), (192, 128, 0), (64, 0, 128), (192, 0, 128), 
                            (64, 128, 128), (192, 128, 128), (0, 64, 0), (128, 64, 0), (0, 192, 0), (128, 192, 0), (0, 64, 128), 
                            (128, 64, 12)]

        
        seg_img = np.reshape(np.array(colors, np.uint8)[np.reshape(pred, [-1])], [original_h, original_w, -1])
        image = blend_images(old_image=old_img, new_image=seg_img, alpha=0.6)
        
        seg_img = cv2.cvtColor(seg_img, cv2.COLOR_RGB2BGR)
        image = cv2.cvtColor(image, cv2.COLOR_RGB2BGR)
        
        # 分别返回预测结果和预测与原图混合的结果
        return seg_img, image

# 进行图像分割
result, image_det = detect_image(model=ort_session, image = ori_image,\\
 name_classes=["background", "sunburn", "Ulcer", "wind scarring"], num_classes=4,\\
  input_shape=[224, 224], device='cuda', weight_type='onnx')

ONNX Runtime用于视频分割

多的不说,直接上代码,注意单帧处理与上述单张图片分割的代码是相同的,这里只需要封装成一个新的函数即可。

视频逐帧处理模版:

 1
 2
 3
 4
 5
 6
 7
 8
 9
10
11
12
13
14
15
16
17
18
19
20
21
22
23
24
25
26
27
28
29
30
31
32
33
34
35
36
37
38
39
40
41
42
43
44
45
46
47
48
49
50
51
52
53
54
55
56
57
58
59
60
61
62
63
64
65
66
67
68
import cv2
import numpy as np
import time
from tqdm import tqdm

# 视频逐帧处理代码模板,只需定义process_frame函数

def generate_video(input_path='videos/robot.mp4'):
    filehead = input_path.split('/')[-1]
    output_path = "out-" + filehead
    
    print('视频开始处理',input_path)
    
    # 获取视频总帧数
    cap = cv2.VideoCapture(input_path)
    frame_count = 0
    while(cap.isOpened()):
        success, frame = cap.read()
        frame_count += 1
        if not success:
            break
    cap.release()
    print('视频总帧数为',frame_count)
    
    # cv2.namedWindow('Crack Detection and Measurement Video Processing')
    cap = cv2.VideoCapture(input_path)
    frame_size = (cap.get(cv2.CAP_PROP_FRAME_WIDTH), cap.get(cv2.CAP_PROP_FRAME_HEIGHT))
    # fourcc = int(cap.get(cv2.CAP_PROP_FOURCC))
    # fourcc = cv2.VideoWriter_fourcc(*'XVID')
    fourcc = cv2.VideoWriter_fourcc(*'mp4v')
    fps = cap.get(cv2.CAP_PROP_FPS)

    out = cv2.VideoWriter(output_path, fourcc, fps, (int(frame_size[0]), int(frame_size[1])))
    
    # 进度条绑定视频总帧数
    with tqdm(total=frame_count-1) as pbar:
        try:
            while(cap.isOpened()):
                success, frame = cap.read()
                if not success:
                    break

                # 处理帧
                # frame_path = './temp_frame.png'
                # cv2.imwrite(frame_path, frame)
                try:
                    frame = process_frame(frame)
                except:
                    print('报错!', error)
                    pass
                
                if success == True:
                    # cv2.imshow('Video Processing', frame)
                    out.write(frame)

                    # 进度条更新一帧
                    pbar.update(1)

                # if cv2.waitKey(1) & 0xFF == ord('q'):
                    # break
        except:
            print('中途中断')
            pass

    cv2.destroyAllWindows()
    out.release()
    cap.release()
    print('视频已保存', output_path)

最后我使用PyQT实现了脐橙缺陷检测论文的UI: https://github.com/caixiongjiang/FastSegFormer-pyqt


最后修改于 2023-05-10

知识共享许可协议
本作品采用知识共享署名-非商业性使用-相同方式共享 4.0 国际许可协议进行许可。